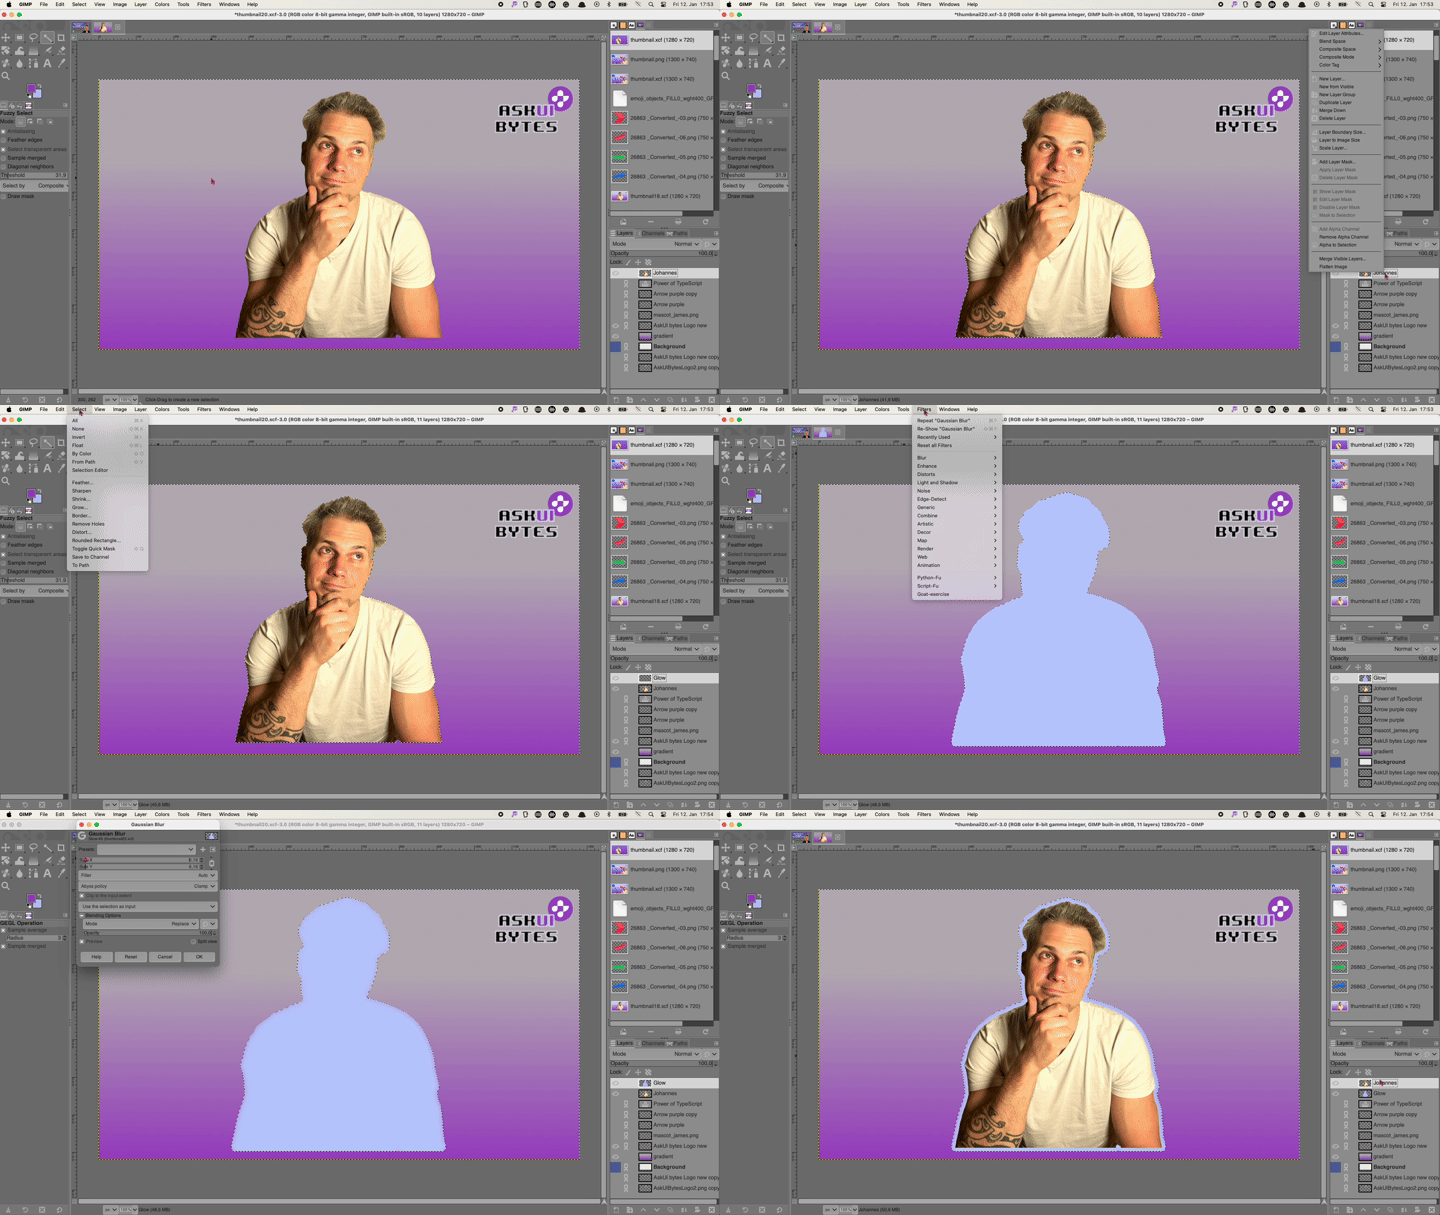
AskUI shines when you realize a workflow has a complex clickpath and you want to automate it adhoc. This blog post shows you how you can automate a graphics effect I need for YouTube thumbnails: Outline glow effect of a cropped out person in Gimp!
Why automate this in the first place? It causes wrist pain because of the long clickpath 😋.
Here is the automation in action:

Prerequisites
- Gimp and a cropped out person you want to a add glow effect to
Prepare Layers in Gimp
Your Layer with the cropped out person needs to have a distinctive name - In this example Johannes. Also scale it to the image size by right-clicking on the layer and select Scale to image size.
Then activate the Magic select-tool (magic wand icon) and place the mouse cursor next to the person.
Step-by-step Code Walkthrough
1. Select Only the Person
With the Magic select-tool clicking left selects everything except the person. By inverting the selection with the shortcut CTRL+i (Command+i on macOS) you select only the person.
// Make sure the focus is on gimp
await aui.mouseLeftClick().exec();

await aui.mouseLeftClick().exec();
await aui.pressTwoKeys('command', 'i').exec();
2. Create New Layer for Glow
Then create a new layer above the layer of the cropped out person layer. This is why you need a distinctive name for it, so you can move the mouse cursor to it reliably 🙂.
await aui.moveMouseTo().text('Johannes').exec();
await aui.mouseRightClick().exec();
await aui.click().text('New Layer...').exec();
await aui.click().button().withText('OK').exec();
3. Grow the Selection and Fill It with Background Color
Let's grow the selection so we can get an actual outline and fill it with the background color.
await aui.click().text('Select').exec();
await aui.click().text('Grow...').exec();
await aui.click().button().withText('OK').exec();
await aui.pressTwoKeys('command', '.').exec(); // Fill
4. Apply Blur Filter for Smoother Glow
Now you have to navigate to the menu item Filters and click it. After that move the mouse cursor to the Blur menu item. Navigate with keypresses to Gaussian Blur and set the size to 6.16 for a nice glow. Apply the filter by clicking the OK-button.
await aui.click().text('Filters').exec();
await aui.moveMouseTo().text('Blur').exec();
await aui.pressKey('right').exec();
await aui.pressKey('down').exec();
await aui.pressKey('enter').exec();

await aui.click().text('Size X').exec();
await aui.click().button().withText('OK').exec();
5. Move the Layer below the Person Layer
Nearly finished! But the glow has to be behind the person. For this you have to drag the person-layer over the Glow-layer in the layers menu.
You can achieve this by doing the following: Move the mouse over the person-layer, toggle the mouse down so you can drag it. Then move it relatively just over the Glow-layer and release the mouse by toggling up.
await aui.moveMouseRelativelyTo(50 ,0).text('Johannes').exec();
await aui.mouseToggleDown().exec();
await aui.moveMouseRelativelyTo(0, -10).text('Glow').exec();
await aui.mouseToggleUp().exec();
Full Code
And finally the full code used for the AskUI Workflow.
  it('Lets Glow', async () => {
    // Make sure the focus is on gimp
    await aui.mouseLeftClick().exec();

    // Start of actual workflow
    await aui.mouseLeftClick().exec();
    await aui.pressTwoKeys('command', 'i').exec();
    await aui.moveMouseTo().text('Johannes').exec();
    await aui.mouseRightClick().exec();
    await aui.click().text('New Layer...').exec();
    await aui.click().button().withText('OK').exec();

    await aui.click().text('Select').exec();
    await aui.click().text('Grow...').exec();
    await aui.click().button().withText('OK').exec();
    await aui.pressTwoKeys('command', '.').exec();

    await aui.click().text('Filters').exec();
    await aui.moveMouseTo().text('Blur').exec();
    await aui.pressKey('right').exec();
    await aui.pressKey('down').exec();
    await aui.pressKey('enter').exec();

    await aui.click().text('Size X').exec();
    await aui.click().button().withText('OK').exec();

    await aui.moveMouseRelativelyTo(50 ,0).text('Johannes').exec();
    await aui.mouseToggleDown().exec();
    await aui.moveMouseRelativelyTo(0, -10).text('Glow').exec();
    await aui.mouseToggleUp().exec();
  });
Conclusion
The automation of the workflow is not faster then me doing it manually. But it is much less straining for your wrist, which is a big thing to keep you productive in the long run.
Want to build an automation yourself? Sign up to get free access to AskUI.


.png)


